
BACK TO INTERNAL WAR STRATEGY
How to Kill a Clan Castle Troop
Quick Version for 90% of CC kills, use "212"
Keeping it simply, you can use 2 barbs, 1 wiz, and 2 witches ("212") to pretty much take out 90% of CC troops. TH8s can do this with 2 witches in their CC and supplying the wiz and barbs. To accomplish this:
- Decide on the kill location of your CC troops so that they are integrated into your attacking army. The biggest mistake people make is to CC kill on one side of the base, then attack from the other side. The CC kill troops quickly die and perform no extra duties. They are powerful, let them help you in your attack.. It's great to have them backing up your GoWiPe or GoWiWi.
- Using the "212" combo, you must have the 2 barbs placed first. They will provide the initial distraction of the oncoming CC.
- The next troop is the wizard. He will start targeting the hoards of troops that are swarming your barbs.
- Finally, 2 witches. They will spawn the skullies to hold back the CC troops and distract them while the wizard is killing
- Optional - your AQ or another wizard can be added behind the witches to help them out. If there is a dragon, you will typically need the extra DPS.
- The deployment of the 212 is very quick, but the order is paramount for the safety of your witches.
PT 1. The Lure
The Lure is what troops you need to use in order to lure out the clan castle. To Lure out the enemy clan castle troops, check the radius of which the clan castle covers. Be sure the building you chose is well within the edge of the CC "ring."
4 Hogs (TH8 needs level 4 or TH9 needs level 5)
Recommended for when Clan Castle radius is within the perimeter of the defense troops, as well as walls are covering the defenses, making it difficult for giants to walk through. Although fewer than 4 can actually get the lure, using 4 will also likely destroy the target tower, which is a bonus.
2 Loons, 1 Hog
Typically, 2 loons would be enough to lure out enemy clan castle if they were archers and wizards BUT, if there are tricky clan castle such as Valkyrie and Balloons in the enemy building, they will NOT target loons therefore, will not even come out. Dropping the two loons first, almost guarentees the survival of the second loon before they destroy the defense target, dropping the hog afterwards, will make it so that the hog isn't targeted as much compared to the loons.
1 Giant 1 Hog
Using the giant first to take a few hits and lock in defenses, the hog will then trip the CC radius and actually do the lure. This saves a few troops but can be useful if you need to devote resources elsewhere. This has more risk.
PT 2. The Anchor
The few key things to remember when you are Anchoring the enemy troops
Suggestion to Anchor: You want this to be as minimal as possible. IF 1 archer can do it, then use simply that. If there is no outlying building, a succession of barbs, slowly placed, can pull troops out of range of defensive towers.
- Bring it into a place (usually the corner) where there is a limited amount of defense protection. Preferable AWAY from mortars.
- You MUST bring witches out (if it applies), within range of an archer drop as well as the fact you don't want it to be behind any junk buildings.
- Optional - BUNDLE up the enemy clan castle, that way you know that they aren't in separate groups, and come at a different time.
Suggestion to Anchor: You want this to be as minimal as possible. IF 1 archer can do it, then use simply that. If there is no outlying building, a succession of barbs, slowly placed, can pull troops out of range of defensive towers.
DON'TS
|
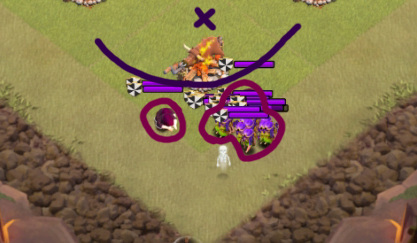
Here is an example of something you DO NOT want to do. This isn't as bad since the archers are in a bundle, but notice how the two separate wizards are outside of the bundle. If you tried to attack it from the sides to secure it, the wizards would be attacking different targets compared to the pack of anchers, making your attack kill squad having to spread out more. The Purple X represents a risky place where Witch could be hidden and protected. The Pack of archer is good, but the side wizards are not.
|
|
Source: "OneHive War #121" 4:19 time stamp
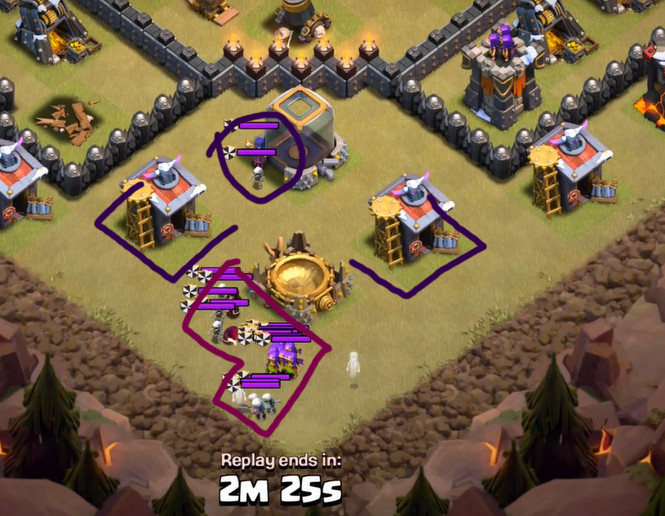
Another Example of what NOT to do. Notice how all the enemy clan castle, are spread out, wizards aren't with archers, skeletons aren't together (Magenta), as well as the the witch isn't out yet. The Witch is being protected behind the two barracks, as well as the spell factory and Dark Elixir Storage (Purple circle), which you need to bring it out, in order to kill. |
|
|
Example Of What Could Go Wrong, Why you Should Bundle
Now with an example by our member Dqwerty in War 41 (don't worry, he got 3 star on this base so the embarassment level off :D), as you ca see that he didn't bundle up the troops into a single group, so when he dropped that first barbarian as a distraction and summoned his witches, some archer on the south already had switched targets towards the witches. If the witches had been killed, the lure would have went horrible wrong, and since this is a Holowiwi attack, without the witches, it would have been disaster results.
|
Do's

|
This is the position which you WANT everything in. Witch is outside the boundary of the junk buildings, as well as the pack of troops are all together bundled up. At this position, you can mass target the group with a loon drop, and pick off the witch as well.
When it comes to witches, it's better to give them enough space to summon the skeletons, but if you are using loons, it could be put at any relative position. |
|
|
Example from our member Kunal, who uses barbarians to round up the loose skeletons and wizards into a pack. This way if you drop any distraction troops, ALL the enemys within that bundle will target and have the same response towards the distraction.
|
PT 3. THE DISTRACTION + KILL
After you have bundled up all the enemy troops, here comes the part where you want to know the most. How do you kill it?
First off you need to recognize you MUST have a distraction in order for your kill squad to beat the enemy.. This is why Barbarians are the BEST distractions, while skeletons provide a better distraction AFTER you have set it up.
Generally it's not recommended to use Clan Castle VS Clan Castle, due to the fact that everything spawns at relatively the same area, at the same time but if you haven't unlocked Loons or Lv 2 Witches, it's best to use this method instead.
ALWAYS HAVE Barbarians ready to distract. Archers are NOT the best distraction due to the fact they are the same distance between kill troops and witches.
There are a few sets to kill the enemy.
CC25: 5Wizards, 5 Barbs.
CC25: 1 Witch, 2 Wizard, 5 Barbs.
CC30: 2 Witch, 6 Barbs.
CC30: 6 wizards, 6 barbs.
If you have unlocked Lv2 Witches or Lv6 Loons I HIGHLY recommend:
2 Loons, + few barbs + few archers. (single troops).
2 Witches + 5 Barbs. (single troops) + maybe a few wizards to speed up the process.
CC Troops: Wizards or Witches
[Coming soon]
Two Witches + Queen
This is highly recommend composition if you have your own Witches Lv2. The steps are still the same, of "Lure, Anchor, and Kill". This one though, requires you to use your Queen to pick off the enemy troops. You may use some wizards if you wish. If you wish to see this tutorial in action, I highly recommend clicking on the link above. Using this set up, you still have witches alive and full hp, and no wasted troops other than the Lure and Anchor, your kill squad will still be alive. Negative side is your queen will be deploy so make sure you deploy her at a spot where you will have her enter.
|
|
Drop Distraction first, then Witch
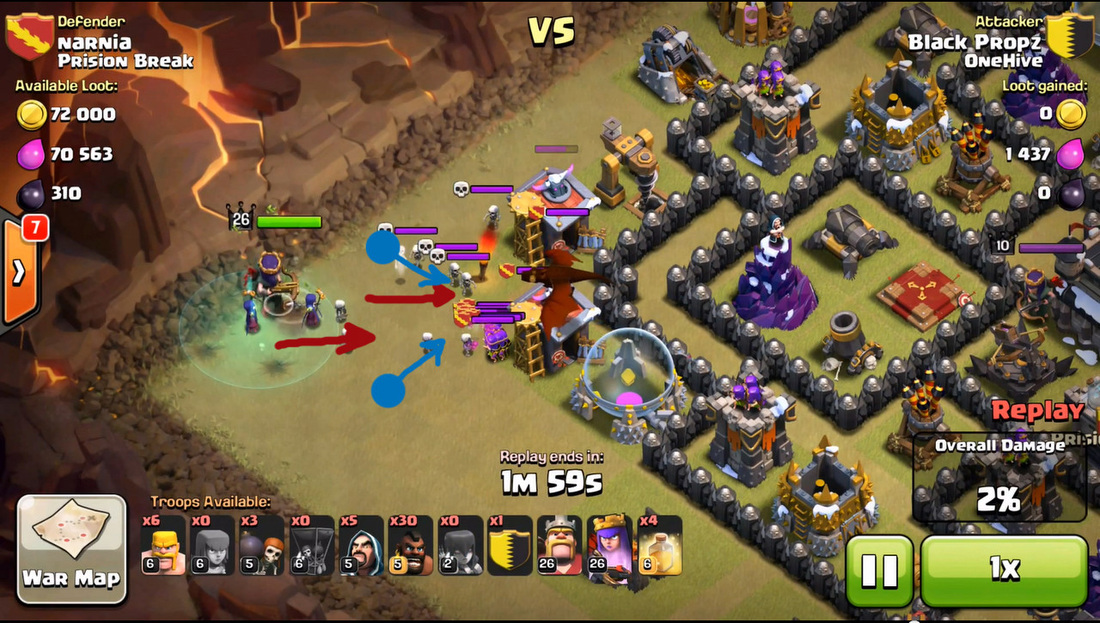
Source: OneHive video "Clean Up Episode #2" 10:12 time stamp
I'm going to skip the Lure, and Anchor part and go straight to the Topic. First after you have set your anchor, and the enemy troops are rounded up, Send out some barbarians as distraction (so that the archers don't focus on your witch) then deploy your first witch. Your witch at this point would start to summon skeletons, The enemy clan castle would have targeted the barbarian and kill it, while your skeletons have already spawned and begun to move. After the first witch has been deployed and summoned the first wave of skeletons, deploy your second witch immediately (+queen) so that the second witch would summon the next wave of Skeletons. Staggering the witch summoning, keeps the skeleton waves being summoned at a different time, therefore, keeping the witches safe. If you look at the colour code, You can see that friendly skeletons from the first witch have begun to head towards the enemy clan castle, while the next witch starts to summon the next wave of skeletons. The Red Arrow shows the difference in the wave of skeletons that would swarm the enemy. If you wish for things to go quicker. The Blue circle are the recommended spots to summon wizards that way, they are out of the range of the skeleton distraction, as well as can target different spots of the enemy clan castle. |
|
|
Here is an example of akiyume (me) using the same method to take out enemy clan castle troops. You can see by dropping my queen to help out, the witches and the Queen eliminated the enemy skeleton troops at a much higher rate and was able to re-target the lv6 wizards. The distractions were at the front, giving enough time for my witch to summon the first set of skeletons, and then summoning the second witch afterwards, bring in the next wave of skeletons.
|
Loon Drop
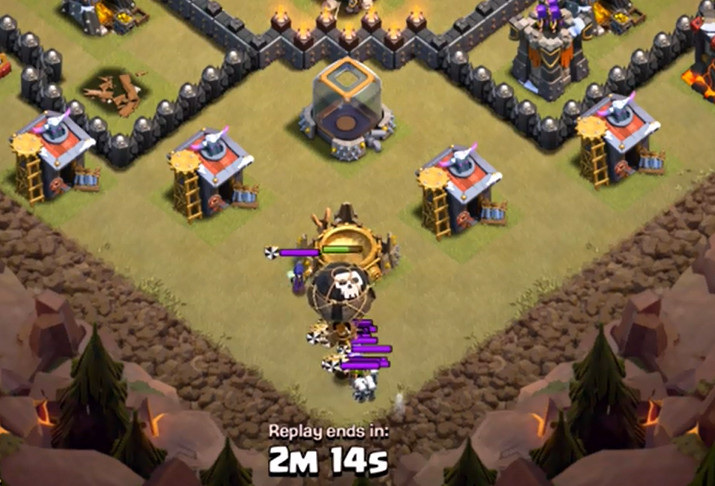
Source: "OneHive War #121" Time Stamped: 4:30
Please only do Loon drops if you have already know before hand what enemy Clan Castles there are. Loon drop will not kill enemy Loons for obvious reasons.
For Loon Drop, there is a certain number for which Loons can kill enemy CC.
Balloon lvl 4: 72
Balloon lvl 5: 108
Balloon lvl 6: 162
Lv6 Loons can suicide dive and kill Lv5 Wizards and below, but they can't kill Lv6 Wizards due to the fact they have extra hp.. But they will be close to being dead as well as the fact they are extremely exposed from the loons wiping out any archers/skeletons from covering them.
After you have bundled the CC troops, drop your loon at least 1 square AWAY from the bundle that way the loon has time to 'float' above the enemy and drop on top of them.
|
|
|
Other Video Examples and Links
Link to OneHive's Post: "Common Mistakes for When Killing and Luring Enemy Clan Castle Troops"